The Windows remote desktop feature is quite useful because it allows you to control and access a remote computer from your current PC. Accessing files on your work computer from the comfort of your home office is an example of this.
However, you must have a reliable internet connection. In addition, both machines must be in the same ecosystem. Finally, you must have the right credentials to get into the remote computer to use this feature. Even with these precautions, the “remote desktop can’t connect to the remote computer” issue may occur due to various circumstances.
Causes Of Remote Desktop Cannot Connect To The Remote Computer
There could be more than one reason behind not connecting to the remote computer. Internet connection is an essential part of this procedure; ensure that your internet connection is perfectly working. Other than this, you are entering the right login credentials.
Once you are over these two main factors, keep reading this article to understand if the issue is still there. TechNinjaPro has assembled the list of causes reported by some affectors.
– Outdated Operating System
After a Windows update or upgrade, the Remote Desktop (RDP) functionality can become corrupted because one of the newly installed files can interfere with the RDP’s operation. You’ll have to figure out what’s causing the problem and solve it yourself.
– Antivirus
Antivirus software can sometimes block RDP, resulting in the error “remote desktop can not connect to the remote computer.” Fortunately, it is easy to identify this issue. First, disable your antivirus and try connecting again. If you succeed in making a connection, you have discovered the source of the error.
– Public network profile
Your computer can restrict remote desktop capabilities as a security measure if you have a public network profile or a networking group. These are the most prevalent causes; however, this is by no means a complete list. The key concern now is how to repair the error “remote desktop can’t connect to the remote computer.”
Fix the Remote Desktop Can’t Connect to the Remote Computer Error on Windows
There are a lot of methods to repair this problem, so you will have to try them all until you find the one that works. However, this is the only way, especially when you have no idea what is causing the problem.
1. Check Windows firewall
The Windows firewall frequently restricts the remote desktop capability. This is because the remote desktop is not enabled by default in the firewall settings, so you will keep getting issues until you go in and allow it. This article will show you how to alter your firewall settings.
- Type “firewall” into your computer’s Start menu and choose Windows Defender Firewall.

- This will open the Windows Defender Firewall’s control panel. Then, on the left-hand side of the window, choose to allow an app or feature through Windows Defender Firewall.

- Then, at the upper right, select the change settings button.

- Find remote desktop/assistance in the list that appears and tick the box next to it.

- To save the changes, click OK.
The issue will be resolved If the firewall was the only item preventing you from connecting remotely. Otherwise, check your firewall settings to determine if the 3389 port is banned. The remote desktop program is linked to this port. If the port is open and the problem remains, another program may be utilizing it. Reset your firewall completely.
2. Edit Hosts File
If you have not saved the internal protocol and host server in the host file, Windows may refuse to allow you to do so. If you’re connecting for the first time, here’s how to solve it.
- Type Command Prompt into your computer’s Start menu and press Enter.
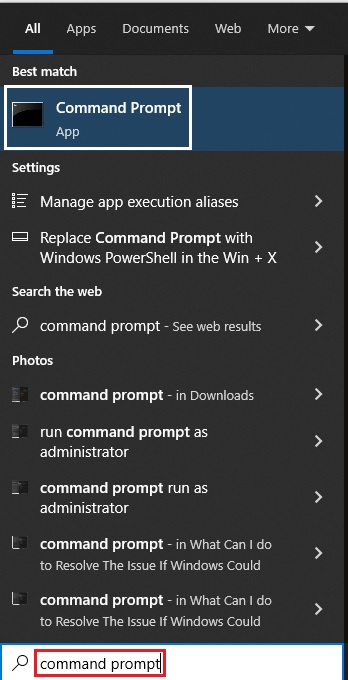
- Type the following command line into the command prompt: cd C:/Windows/System32/Drivers/etc

- To open the host’s file, use the following command: notepad hosts
- This will display all of the hosts currently stored on your computer.
- Look for the computer’s internet protocol (IP) and server name in the address bar. If it is not already on the list, you will have to add the new IP address manually.
- Just make sure you press save when you’re ready to dismiss the notepad.
3. Make Changes to Registry
In this fix, you will make changes in your computer registry to make the remote desktop use an RPC/HTTP connection instead of an HTTP/UDP connection. Carefully follow all the steps given below to complete this process:
- Press Windows + R, this will bring up the Run program.
- Type regedit into the search box and press Enter.

- Find HKEY_CURRENT_USER > Software > Microsoft > Terminal Server Client in the registry.

- After selecting it, go to the right-hand pane and right-click.
- Choose to create a new > DWORD (32-bit).
- Give it the name RDGClientTransport.
- This will result in the creation of a new file. To open it, double-click it.
- Look for a section with value data in the properties. You’d like to set the value data to 1.
- After that, click OK to close the registry window.
4. Check the Group Policy Settings
Wrong group policy settings can be another source of the “remote desktop can’t connect to the remote machine” issue. Do the following to see if these are true.
- Press Windows + R, this will bring up the Run program.
- Type gpedit.msc into the search box and press Enter.

- To access remote desktop session host and connections, go to Computer Configuration and administrative templates.
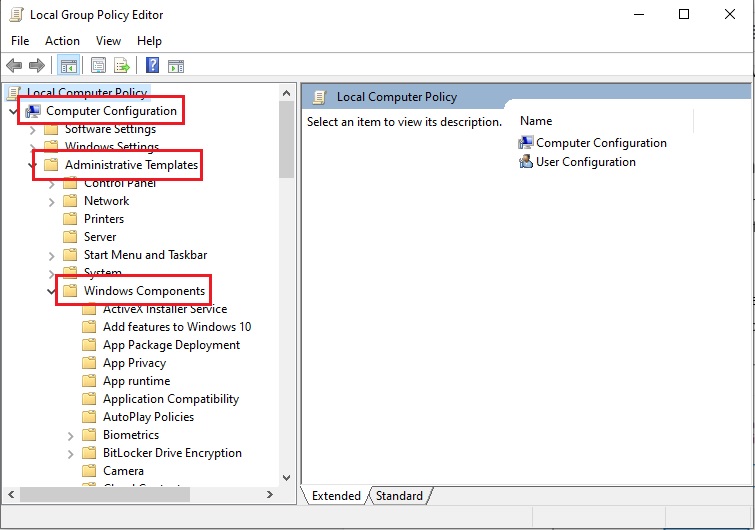
- In the administrative templates, open windows components and then remote desktop services.
- In the remote desktop services, open remote desktop session host and connections.
- Use the remote desktop service option to find the option to connect remotely.
- If this option is currently disabled, enable it.
If the gpedit.msc is not working, that means your group policy settings on your computer network are turned off.
5. Shut down Custom Monitor Scaling
In the case of a larger monitor, you may be able to use the custom scaling feature to make it appear in the same resolution as the computer you’re using. However, the remote desktop may not work as a result of this. Here’s how to disable it.
- Open Settings from your computer Start menu.

- Select System as the first option.

- Scroll down the left-hand menu until you locate the Remote Desktop.

- Click on Remote Desktop Options from the drop-down menu.
- You will get a notification that states “a custom scale factor is set” if custom scaling is enabled.
- After that, sign out and switch off custom scaling.
After you log in to your computer, the scaling will be restored to its original state, and you should have no trouble connecting.
Conclusion
In this article, you will find the best solutions to the problem of connecting a remote desktop to your remote computer. But before you apply any of these, make sure that both devices are fully active.