You can easily change backup location along with file history in Windows 10 by:
- Going to Start by clicking on the Windows Icon.

Windows Icon - Go to Settings.

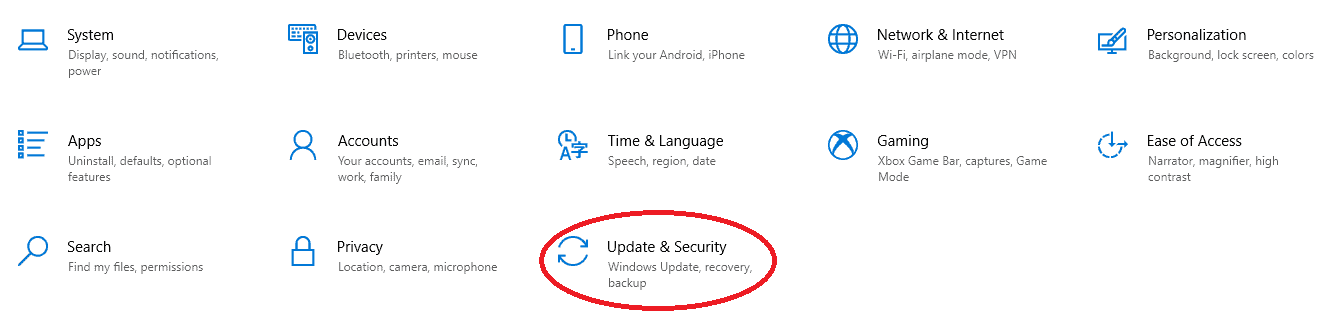
settings - Locate Update & Security.

Update and Security - Go to Backup.

backup - Click on Add a drive option and the choose:
- Local Drive (internal or external) or,
- Network Location.

Add a Drive
- Thus, your Windows Backup Location will be changed.
- Going to Start by clicking on the Windows Icon.


How to restore files with File History?
In some instances, you might be missing a few important files or folders which you have backed up but couldn’t find. Follow the below mentioned steps to get them back:
- Go to the Search Box on your taskbar and type Restore Files.
- Select the Restore Your Files with File History option.
- Now thoroughly look for the files which you are missing and you can use the arrows to see all the versions of each single file.
- Once you find the file/files you are looking for, select Restore and save it in its original location.
- If you want to save the file in a different place:
- Right-Click on Restore.
- Select Restore To.
- Choose the new location.
How to Change Settings of Windows Backup in Windows 10?
History lesson – the Backup and Restore feature was initially included in Windows 7 but was removed in Windows 8.1. However, it has been brought back in Windows 10. You can use this feature to restore any of the Windows 7 backups on your WIndows 10 PC in addition to performing backups and restores solely on your Windows 10 PC also.
The Windows Backup feature will help you to backup your entire file inventory, libraries, drives, and folders. You also have the choice to include system image in the backup and schedule them accordingly.
As your Windows Backup has been set up, you can make several changes to it as per your need. Here’s how you can do it:
- Go to Start by clicking on the Windows Icon.
- Go to Settings.
- Locate Update & Security.
- Go to Backup.
- Now click on Go to Backup and Restore (Windows 7). A new dialogue box will open.
- Locate the Change Settings option in the Backup Section. Click on it.
- Your Windows Backup will start now.
- You can Save your Backup whether Locally or in a Network location.
- To Save a Local Backup (internal or external): Select ‘on the drive’ and Click on Next.
- To Save in Network: Click on Save on Network. Then click on Browse and select the Network Location. Once done, click on OK.
- A question box will appear ‘What do you want to back up?’. Select the box Let me Choose. Click on Next.
- Check the boxes which you want to be included in your backup session. Also, you can check the box for ‘Include a system image of drives’ if you want to. Click on Next afterwards.
- A dialogue box will appear with the heading ‘Review your backup settings’. Click on Change Schedule.
- Turn On Automatic Backup on Schedule:
- Check the Run backup on a schedule.
- Set the relevant setting on – How often, What day, and What time.
- Click on OK.
- Turn Off Automatic Backup:
- Simply uncheck the box Run backup on a schedule.
- Turn On Automatic Backup on Schedule:
- Once the above settings are complete, click on Save settings and exit.
- Now go to your ‘Backup and Restore (Windows 7)’ window and click on the ‘Back up now’ button (with new settings in place).
- Your new backup will be created as per your changed settings.
Backup & Restore your Data with AOMEI Backupper
AOMEI Backupper is a software that automates the entire process of backing up your data and then restoring it as per your needs and requirements. The software can be used for both home purposes and business usage.
Backupper comes with a feature-rich package where you can perform disk backup, restoring and cloning. You can also manage your disk images once the software is installed on your PC. It supports a wide range of external and internal storage devices like HDD, SSD, SSHD, Flash Drives, Thumb Drives, NAS, Hardware RAID, and several Virtual Systems.
With AOMEI Backupper, you can perform:
- Full disk partitions.
- System only backups.
- Backup specific files or folders.
- Synchronize files between various locations.
- Schedule backups.
- Triggered backups.
- Restoring.
- Disk cloning.
- And more.
The interface of the software is sharp, clean, user-friendly, and has large icons. Anyone can use it to perform backup & restore in just a few steps.