

Yes, you can easily disable sedlauncher.exe, but it is recommended that you only do so if the app severely impedes your PC’s performance. If you are experiencing issues such as high disk capacity or other problems of a similar nature, then follow the steps below that can either disable or block the service on your PC.
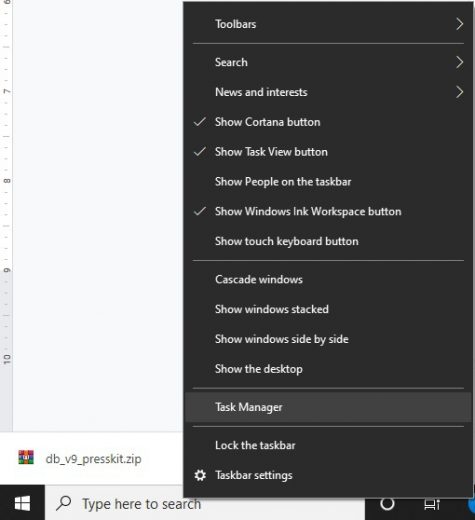
Disable Sedlauncher.exe with the Task Manager
- Right-tick on the Windows button and tick on Task Manager.

- Under process, find out sedvsc and tick on it once.
- Right-tick on Windows Remediation Service.
- Select End Task.
- In the end, reboot the system.
Terminate the REMPL Task
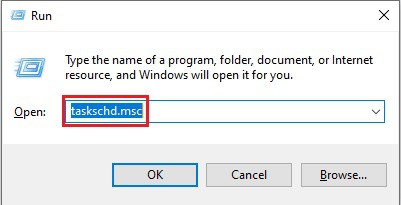
- Press the Windows Key + R to open the Run Command Dialogue Box.

- Type taskschd.msc and press the Enter button.
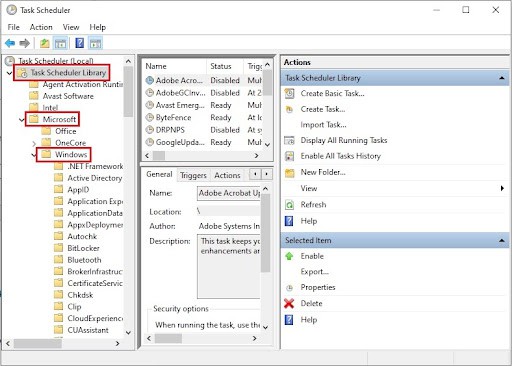
- From the left-hand side, tick on the Task Scheduler Library.
- Navigate to Microsoft > Windows.

- Now locate rempl.
- Choose the shell task on the right-hand separation and press the delete key.
- Press YES to confirm the deletion.
Disable Sedlauncher.exe from Services
The most efficient method is to disable Sedlauncher.exe to prevent starting on Windows startup.
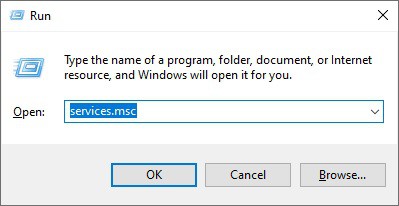
- Press the Windows Key + R and type services.msc and tick OK.

- From the right-hand side, locate Windows Remediation Service.
- Right-tick on it and select Properties.
- From the drop-down menu, locate under Startup type and select Disabled.
- Tick on Apply and OK.
Use a Firewall to Block the Windows Remediation Service
If all the above techniques fail, then you may add a restriction on Windows 10 to block Sedlauncher.exe:
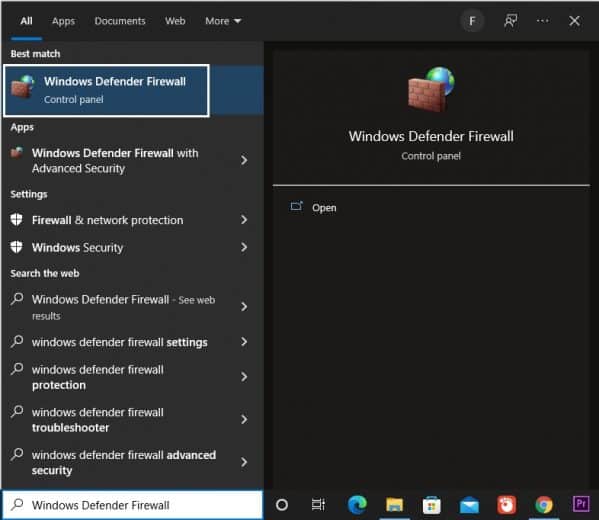
- Press the Windows key and type Windows Defender Firewall and tick on it.

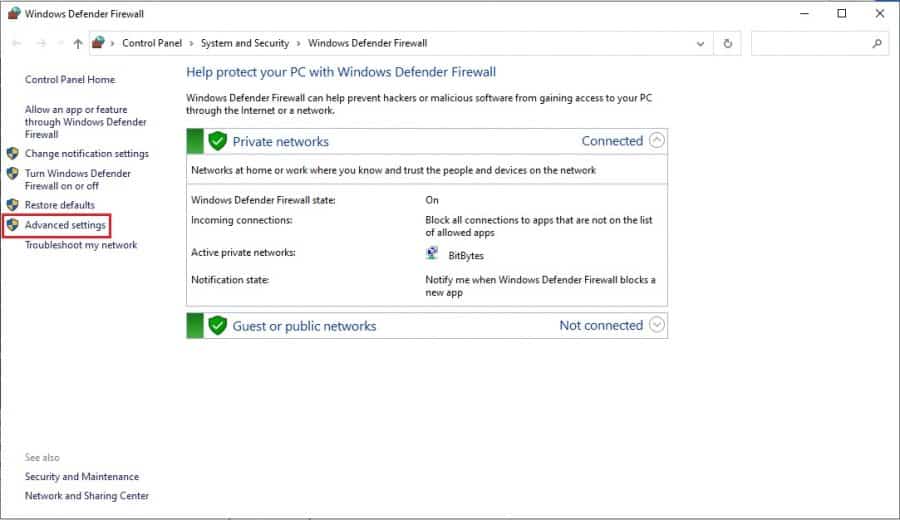
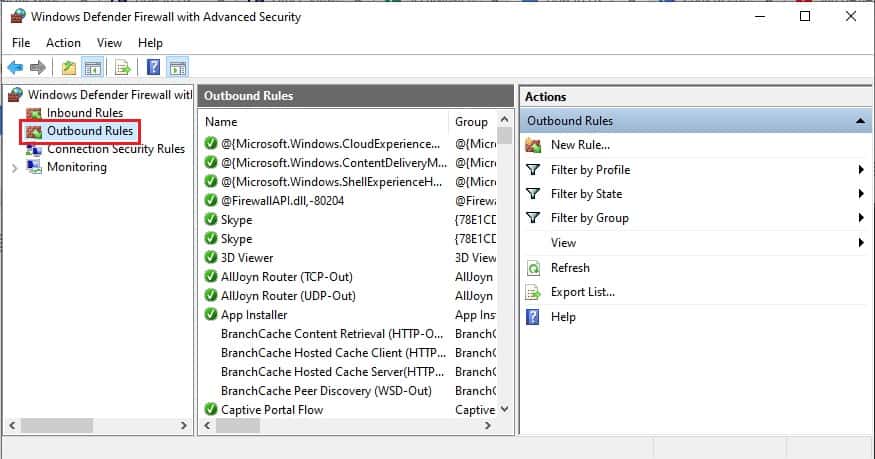
- Tick on Advanced Settings and tick on Outbound Rules.


- In the upper right corner, pick New Rule.

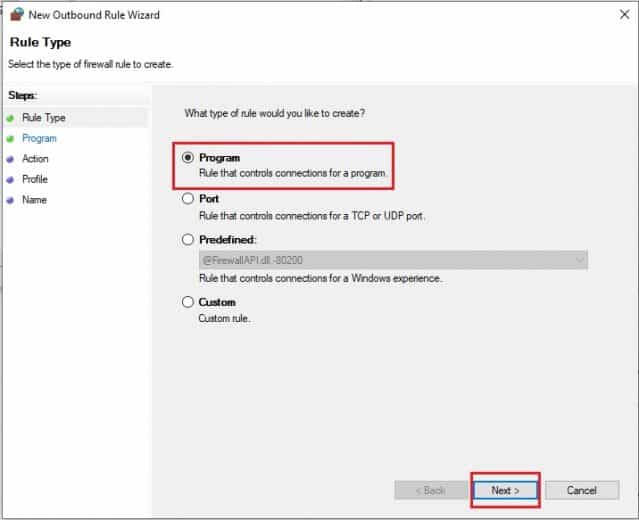
- Choose Program in the pop-up screen and Click Next.

- Navigate to the original location of the Remediation Service.
- Choose the sedsvc.exe file and tick all the Next’s to complete the whole process.
- Input a name for the new rule and choose Finish.


Being a part of the new Windows update KB4023057, Sedlauncher.exe is important for Windows 10 update, but if you hesitate upon 100% disk usage, it is clear to disable Sedlauncher.exe on Windows 10 temporarily. It is said that the components of Windows update KB4023057 try to access your internet network, such as Sedlauncher and sedvsc, which may be the reasons why Sedlauncher.exe high disk appears.
To remove the high disk error by Sedlauncher, you are proposed to turn off the Windows Remediation Service in the Task Manager and Service Program.
1. Disable Sedlauncher.exe in Task Manager
In the very beginning, to disable Sedlauncher.exe from working in the hope that 100% disk usage can be fixed, you might end the task.
- Right-tick the Start Menu and then choose Task Manager from the list.
- In the Task Manager, scroll down to locate Windows Remediation Service and then tick it to end the process.
- Reboot Windows 10 to take effect.
From now, program files like sedsvc.exe, sedlauncher.exe, rempl.exe, and remsh.exe would not function as you have ended the program Windows Remediation Service. It is a thing that Sedlauncher.exe high disk or CPU disappeared from Windows 10.
2. Disable Sedlauncher.exe Related Programs and Services Automatically
It is not unusual that you find it of no use stopping the Sedlauncher in the Task Manager as some third-party apps pretend to be Windows-based programs using this Sedlauncher.exe process. If this is the case, there is a high probability that you have to get the most of Advanced System Care to disable this Windows update relevant program without any interruption.
As an all-in-one system optimizer, Advanced SystemCare will monitor the whole process, service, and app performance using its performance monitor tool, and it can also enable you to stop specific programs from running at startup, such as Sedlauncher.
- Download and install the Advanced System Care.
- Run the Advanced System Care.
- Under Toolbox and tick the Startup Manager.
The moment you click Startup Manager, you can see Advanced System Care is installing this toolbox easily and directly. - In IObit Manager, scroll down to find out Sedlauncher.exe and set it Disabled under the services.
- Find out the Startup Items, and then disable the Sedlauncher program at startup.
Without the Sedlauncher running at startup or in the background by malware, you can see Sedlauncher.exe high disk usage disappear from your sight. (Read complete Review of Advanced SystemCare PRO)
3. Turn off Sedlauncher.exe in Services
Windows is also a management tool for programs, apart from the Task Manager. So, there is a high possibility that you can easily disable Sedlauncher.exe here, and Sedlauncher.exe will cause no more high disk usage.
- Press the Windows + R Key to open the Run box and type in Services.msc in the box.
- In Services, scroll down to find Windows Remediation Service and then right-tick it to navigate its properties.
- Under the General tab, find the Startup type and set it Disabled.
- Under the Service status, stop it.
Here you can locate a service titled Windows Update Media Service. Try to disable it to solve the WaaSMedic High Disk Usage error on Windows 10. - Restart your computer.
- After restarting, you can go to Task Manager to check whether Sedlauncher disk high disk usage error persists.
If the error still remains, perhaps you have to supervise Windows 10 update patch KB4023057 and stop it from running in anti-malware software or Windows 10 Firewall.
4. Block Sedlauncher.exe with Anti-malware Programs
Thirdly, the time you observed high disk usage by Sedlauncher.exe, if possible, you may determine to uninstall the rempl file on Windows 10. In other words, the updating patch KB4023057 needs the Sedlauncher.exe program when not in use, and this Sedlauncher.exe process can be disabled via the third-party Firewall or Software.
Therefore, Sedlauncher.exe will not go through Windows 10 using high disk space or Firewall. You can download anti-malware software and then set it to block Windows Remediation Service from working.
Or, if you fail to tackle Sedlauncher high disk space usage error, you can attempt to restore Windows 10.
5. Performing a System Restore
The best thing about Windows 10 is, it lets you bring your operating system back to an error-free and functional version. You can efficiently use a previous restore point to solve the Sedlauncher high disk usage error. Do not worry about losing your private files or data because this technique will only affect the system files.
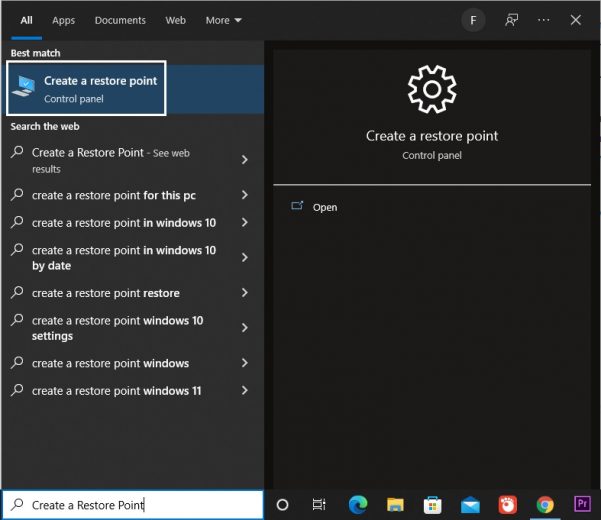
- Press the Windows Key + S on your keyboard.
- Inside the Search box, type “Restore.”
- Choose “Create a Restore Point” from the Restore results.

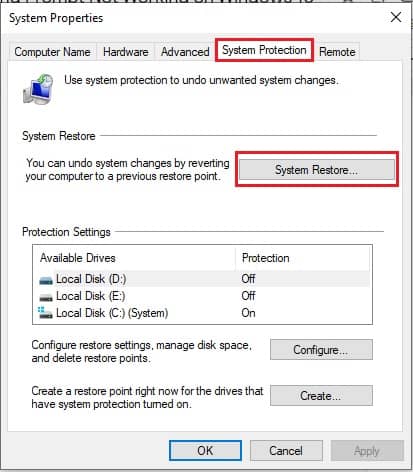
- Tick the system restore button.

- Tick Next to start.

- Look at the digital records of the restore points. Select an option wherein the error did not exist.
- Tick Next to start the system restore process.

These techniques should be able to help you solve the Sedlauncher high disk usage error. However, if you have tried all of the solutions mentioned above and yet your PC is still sluggish, then it is likely that something else is creating this issue.